

School Lunchbox Idea 7: 4 Delicious Kids Lunch Recipes
School Lunchbox Idea 7 brings together four homemade favorites in one colorful bento box: crispy potato croquettes, golden baby potatoes, a fresh calamari salad, and chocolate-dipped banana bites.
If you’re looking for creative school lunch ideas for kids, this combination offers something a little different from the usual sandwich-and-fruit routine.
The inspiration for today’s lunchbox started with one simple question: How can I prepare a homemade school lunch that looks exciting without spending the entire morning in the kitchen?
My solution is to prepare the main components ahead of time and arrange them in a practical, three-compartment lunchbox.
The potato croquettes provide a comforting main dish, the baby potatoes are easy to season, the calamari salad adds fresh ingredients, and the banana bites turn an everyday fruit into a playful dessert.
And the best part? You can customize nearly every component to suit your child’s preferences.
What’s Inside School Lunchbox Idea 7?
This colorful kids’ school lunchbox contains four different foods arranged in three compartments.
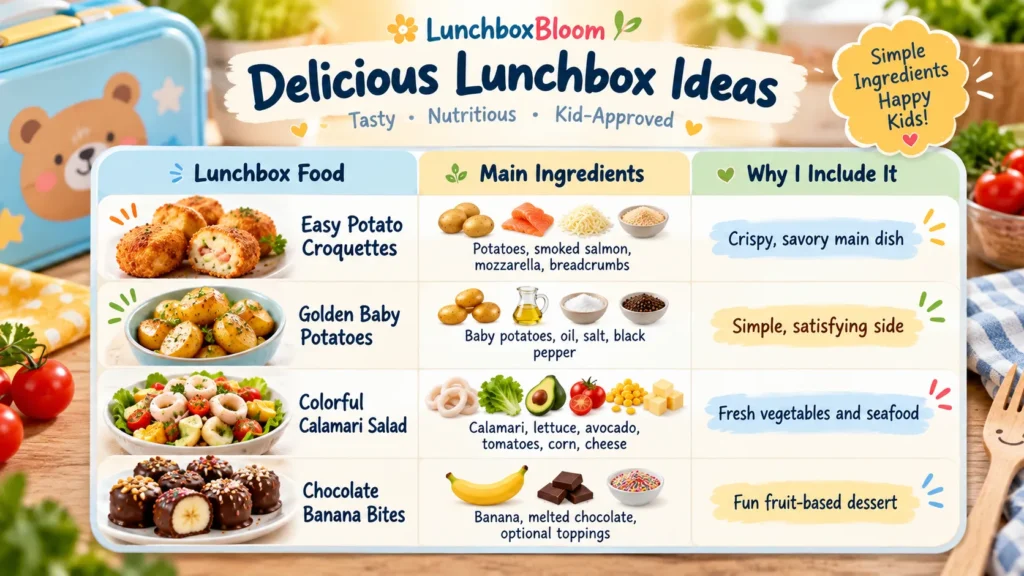
The finished lunchbox uses one large compartment for the croquettes and potatoes, one smaller compartment for the salad, and another for the banana dessert.
1. Easy Potato Croquettes: The Crispy Main Dish
Let’s start with the recipe that makes this lunchbox special.
These homemade potato croquettes are golden and crunchy on the outside, with a soft, comforting filling made from mashed potatoes, smoked salmon, and mozzarella.
I love the contrast between the breadcrumb coating and the creamy potato center.
When the croquettes are freshly cooked, the mozzarella melts into the filling, creating a delicious cheesy bite.
Ingredients for the Potato Croquettes
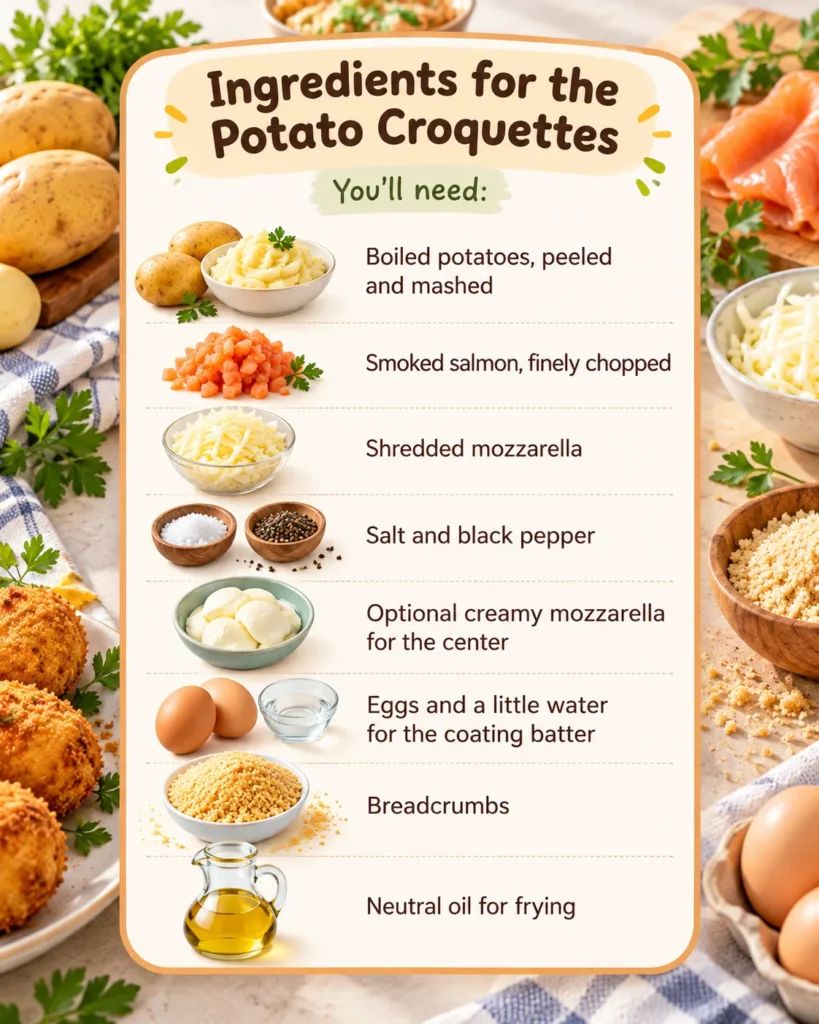
Want the exact recipe with detailed instructions and ingredient notes?
Read my Easy Potato Croquettes for Kids recipe.
2. Golden Baby Potatoes: An Easy School Lunch Side Dish
The second component of School Lunchbox Idea 7 is a small serving of golden baby potatoes.
Sometimes, the simplest recipes are the easiest to include in a weekly lunchbox routine.
These potatoes don’t need an elaborate sauce or a long list of seasonings.
Just a little oil, salt, and black pepper can create a delicious side dish.
Ingredients for Golden Baby Potatoes
For one small lunchbox serving, I use approximately:
- 4–6 small baby potatoes
- 1 teaspoon olive oil or another cooking oil
- A small pinch of salt
- A little black pepper
How to Make Golden Baby Potatoes
Step 1: Wash and slice.
Wash the potatoes thoroughly and cut them in half. Keeping the pieces similar in size helps them cook more evenly.
Step 2: Cook until tender.
Add the potatoes to a skillet with a little oil. Cook over moderate heat, turning occasionally.
If the pieces are thick, you can parboil them first to help the centers become tender before browning.
Step 3: Add seasoning.
Sprinkle with salt and black pepper.
There’s no need to add a complicated spice blend. A simple seasoning allows the natural potato flavor to remain familiar.
Step 4: Let them turn golden.
Continue cooking until the cut surfaces develop a light golden crust and the centers are completely tender.
Step 5: Cool and refrigerate.
Let the potatoes cool briefly, then refrigerate them promptly until it’s time to assemble the lunch.
Easy Potato Variations
For future school lunches, you can try different seasonings:
- A little garlic powder for a savory version
- Mild paprika for extra color
- Dried parsley for a simple herb flavor
- A small sprinkle of grated cheese
You don’t need to use a different seasoning every time. Keeping the recipe familiar can make morning preparation much easier.
3. Colorful Calamari Salad: Fresh Vegetables in a Bento Box
The salad is the most colorful part of this kids’ lunchbox idea.
Instead of packing plain lettuce on its own, I like preparing a small mixture of vegetables and seafood.
The combination includes cooked squid rings, lettuce, cherry tomatoes, avocado, sweet corn, and cheese.
Each ingredient brings its own flavor and texture.
And visually, the salad looks lovely in a separate blue lunchbox compartment.
Ingredients for the Calamari Salad
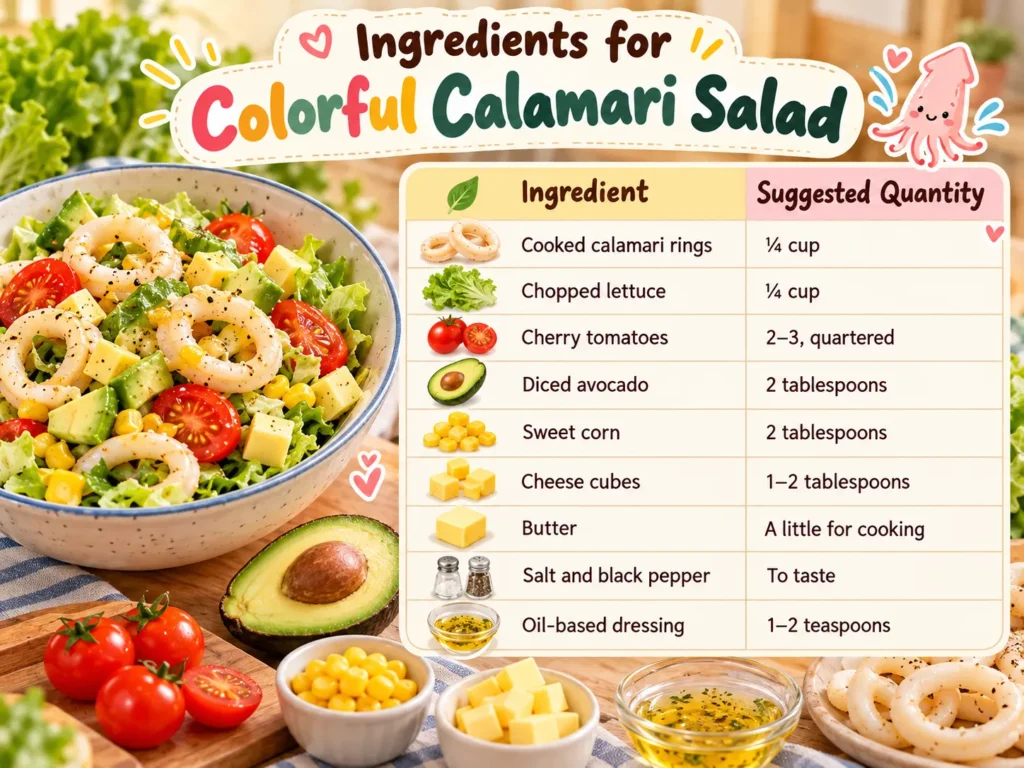
Quantities are approximate and can be adjusted to your child’s age and appetite.
How to Prepare the Calamari Salad
Step 1: Cook the Calamari
Heat a little butter in a skillet.
Add the cleaned squid rings, followed by a small amount of salt and black pepper.
Cook the calamari until fully cooked and tender.
Avoid unnecessarily prolonged cooking because squid can become rubbery.
Once cooked, transfer the calamari to a clean container and refrigerate promptly.
Step 2: Prepare the Lettuce and Tomatoes
Wash the lettuce and tomatoes thoroughly.
Chop the lettuce into manageable pieces and quarter the cherry tomatoes.
Smaller tomato pieces are more practical for children than whole round tomatoes, especially for younger eaters.
Step 3: Add the Avocado and Corn
Cut the avocado into small cubes.
Add the lettuce, tomato pieces, sweet corn, and avocado to the salad compartment.
The yellow corn, green avocado, and red tomatoes give the salad a colorful appearance without requiring any special decoration.
Step 4: Add the Cooked Calamari
Arrange the chilled, cooked calamari rings over the vegetables.
I like leaving a few rings visible because they make the salad look different from a typical chopped vegetable side.
For children who are still learning to enjoy seafood, cut the rings into smaller, age-appropriate pieces.
Step 5: Add the Cheese
Finish with a few small cheese cubes.
The cheese contributes a mild, familiar flavor alongside the vegetables and seafood.
Can I Replace the Calamari?
Absolutely.
If your child doesn’t enjoy squid, you can substitute fully cooked, chilled chicken pieces.
You can also prepare a vegetarian version with just the vegetables, cheese, and another suitable protein source.
There’s no reason to force a particular ingredient into a lunchbox if it isn’t right for your family.
Allergy note: Calamari is a molluscan shellfish. The full lunchbox also contains fish, dairy, egg, wheat-containing breadcrumbs, and potentially nuts. Always check ingredients and school allergy policies.
4. Chocolate-Dipped Banana Bites: A Fun School Lunch Dessert
Now for the part that makes School Lunchbox Idea 7 especially playful!
These little chocolate-covered banana bites are simple to prepare, but they look like miniature desserts.
And unlike completely chocolate-coated fruit, I dip only the bottom part of each banana piece.
Ingredients for Chocolate Banana Bites
You only need a few ingredients:
- 1 medium banana
- 1–2 tablespoons melted chocolate
- Optional colorful sprinkles
- Optional sliced almonds
- Optional crushed cookies or cereal flakes
How to Make Chocolate-Dipped Banana Bites
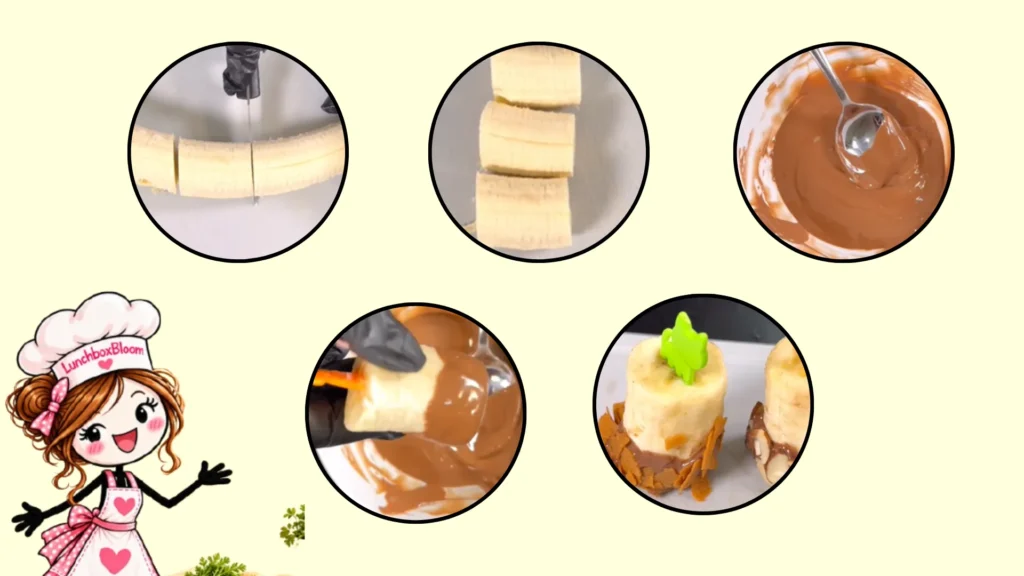
Step 1: Slice the Banana
Peel the banana and cut it into thick pieces.
I prefer pieces that can stand upright on their flat ends.
This creates the cute little dessert shape shown in the lunchbox.
Step 2: Melt the Chocolate
Place your chosen chocolate into a microwave-safe bowl.
Heat gently in short intervals, stirring between each one until the chocolate becomes smooth.
You can also melt it using a heatproof bowl over gently simmering water.
Step 3: Dip Just One Side
Hold a banana piece and dip only the bottom portion into the melted chocolate.
This gives you a thin chocolate layer at the base while keeping the rest of the banana visible.
Step 4: Decorate the Banana Bites
While the chocolate is still soft, add your favorite toppings.
For this lunchbox, I love using three different styles.
Banana Bite #1: Colorful Sprinkles
Dip the chocolate-covered end into a small bowl of colorful sprinkles.
The bright colors create a playful look.
Banana Bite #2: Sliced Almonds
Gently press sliced almonds around the chocolate coating.
This adds a little crunch and a different appearance.
Use this variation only when appropriate for your child’s age and school allergy policy.
Banana Bite #3: Crunchy Cookie Crumbs
Roll the chocolate-coated end into crushed plain cookies or cereal flakes.
The crumbs create a different texture without requiring another dessert recipe.
Step 5: Let the Chocolate Set
Place the decorated banana pieces onto parchment paper.
Refrigerate briefly until the chocolate becomes firm.
Then move them carefully into their lunchbox compartment.
How to Prevent Banana Bites From Getting Messy
The most important trick is to let the chocolate set before packing.
If the coating is still soft, the banana pieces may stick to the lunchbox or transfer chocolate to nearby foods.
I also prefer preparing the bites close to packing time.
Freshly cut bananas can become brown and softer during storage, even when dipped in chocolate.
Keep the prepared bites chilled and handle them gently.
Make-Ahead Tips for Busy School Mornings
One of the easiest ways to make a homemade lunchbox feel manageable is to divide the preparation into smaller tasks.
You don’t need to prepare everything at the same moment.
The Evening Before
I recommend completing the tasks that require the most cooking:
- Prepare and cook the potato croquettes.
- Cook the baby potatoes until tender and golden.
- Cook the calamari completely.
- Wash the vegetables and dry the lettuce.
- Refrigerate the cooked ingredients promptly in covered containers.
Keep seafood and vegetables in separate containers.
This also makes it easier to adjust portions the next morning.
On the School Morning
Finish the quick tasks:
- Dice the avocado and prepare the salad.
- Add the chilled calamari and cheese.
- Cut the banana into pieces.
- Dip the banana pieces in chocolate and add toppings.
- Allow the chocolate to set in the refrigerator.
- Assemble the chilled lunchbox.
- Pack it in an insulated bag with at least two frozen cold sources.
The morning work is much easier when the main cooking is already finished.
How to Keep This School Lunch Safe Until Lunchtime
This is especially important because the lunchbox contains cooked seafood, smoked salmon croquettes, dairy products, and cut fruit.
These foods need proper temperature control.
Here’s how I recommend packing this lunch:
- Refrigerate cooked components promptly after preparation.
- Keep cold foods at 40°F (4°C) or below.
- Use an insulated lunch bag with at least two frozen cold sources.
- Place the cold sources around the perishable food containers.
- Keep the salad dressing sealed separately.
- Use a school refrigerator if one is available.
Don’t rely on the lunchbox compartments alone to keep food cold.
If your child’s school cannot accommodate safe cold storage, choose different, shelf-stable foods rather than packing cooked seafood and dairy unrefrigerated.
Is School Lunchbox Idea 7 Good for Picky Eaters?
It can be adapted for children who prefer familiar flavors or separate foods.
One feature I especially appreciate about compartment-style lunchboxes is that parents can control how ingredients are presented.
For example, a child may enjoy plain corn but dislike a fully mixed salad.
Instead of mixing everything before packing, you can leave the vegetables in separate little groups.
The child can decide whether to combine them.
You can also make small modifications to the main dish.
If smoked salmon is unfamiliar, prepare the potato croquettes with mozzarella only.
If the calamari feels too adventurous, offer a familiar, fully cooked protein with the same vegetables.
Final Thoughts: A Homemade Lunchbox With Four Fun Ideas
School Lunchbox Idea 7 is one of those school lunches that combines a few simple ideas into something colorful and practical.
Three golden potato croquettes.
A handful of seasoned baby potatoes.
A fresh calamari salad with vegetables and cheese.
And three chocolate-dipped banana bites to finish.
I especially love how the finished lunchbox brings together a homemade main dish, a fresh side, and a playful fruit dessert without needing four complicated recipes.
You can prepare much of the cooking ahead of time, customize the ingredients, and adjust the portions to suit your child.
That’s what I want Lunchbox Bloom to be about: creative homemade school lunch ideas that families can adapt to their real routines.
Looking for more school lunchbox inspiration?
Follow Lunchbox Bloom on Facebook for more colorful bento ideas, easy school lunch recipes, and homemade snacks for kids.
And don’t forget to save this School Lunchbox Idea 7 for the next time you’re planning your child’s school lunches! ❤️