

Chocolate Chip Mini Cakes for Kids: 7 Irresistible Steps
There’s something about the smell of cake baking in the oven that makes my kitchen feel instantly happier.
It doesn’t matter whether I’m having a calm afternoon or one of those days when everything seems to happen at once.
The moment I smell vanilla and chocolate, my mood changes.
And my kids somehow appear in the kitchen.
Funny how that works, isn’t it?
For School Lunchbox Idea #12, I wanted a homemade dessert that was small enough to fit into a lunchbox but still felt like a proper little treat.
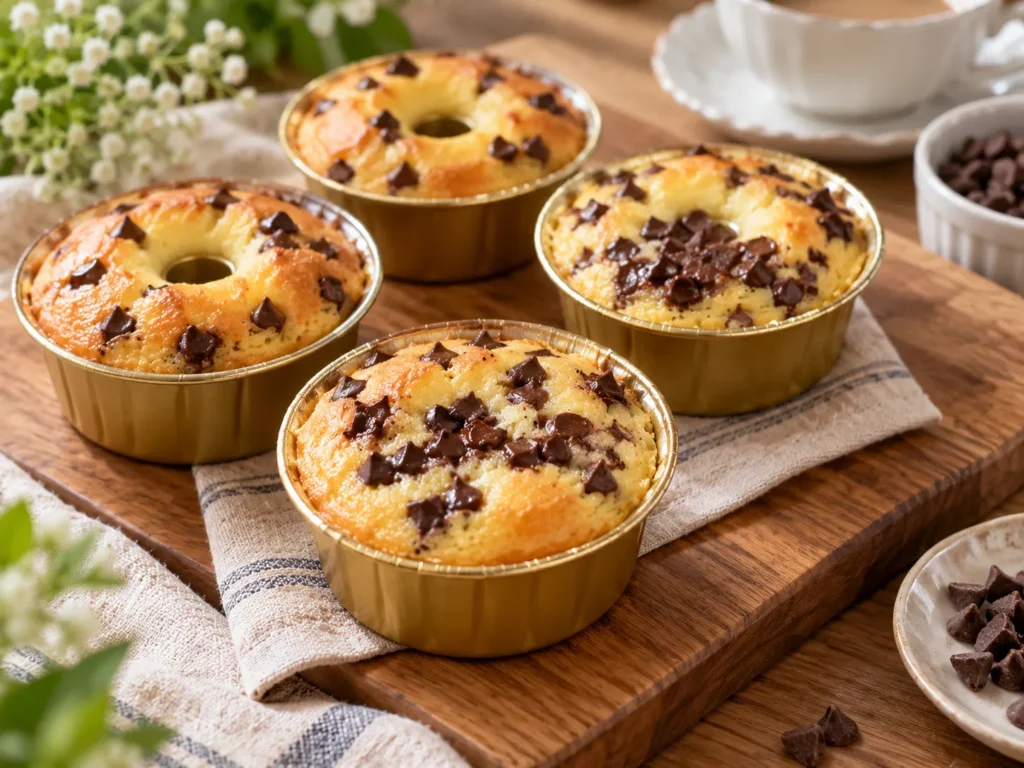
So I made these chocolate chip mini cakes in two different shapes.
Some were baked in a mini doughnut-style mold, while others went into individual baking cups.
The result was a batch of soft little cakes dotted with chocolate pieces.
And here’s my favorite part: the recipe makes enough batter to prepare several mini cakes, so I can save extras for another day.
👩🍳 Recipe at a Glance
Times are approximate and may vary by oven and mold size.
Why I Love These Chocolate Chip Mini Cakes
These cakes are made with familiar baking ingredients: eggs, sugar, butter, oil, milk, flour, vanilla, and baking powder.
Chocolate chips bring little pockets of sweetness to each bite.
Unlike fried doughnuts, these are baked cakes. The doughnut-shaped versions simply take their shape from the mold.
I especially like making different shapes from one batter.
It’s a fun way to add variety without preparing two separate recipes.
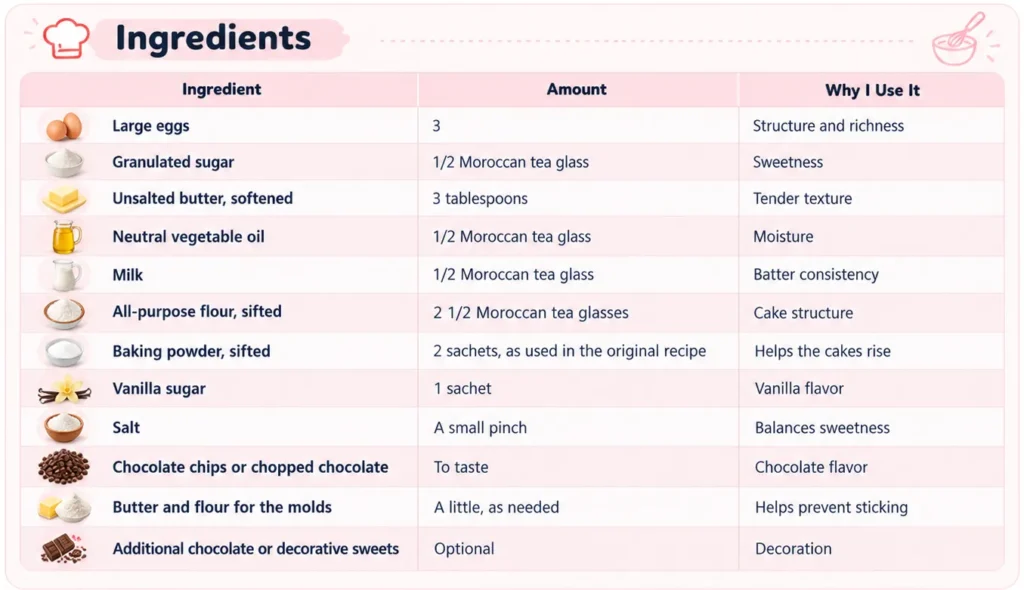
Ingredients for Chocolate Chip Mini Cakes
For this recipe, I’m preserving the original Moroccan tea-glass measurements used in my kitchen.
Important measurement note: Moroccan tea glasses are not all the same size. Use the same glass for measuring sugar, oil, milk, and flour, and measure your glass’s capacity before attempting a precise US-cup conversion.
How to Make Chocolate Chip Mini Cakes in 7 Easy Steps
Step 1: Whisk the Eggs and Sugar
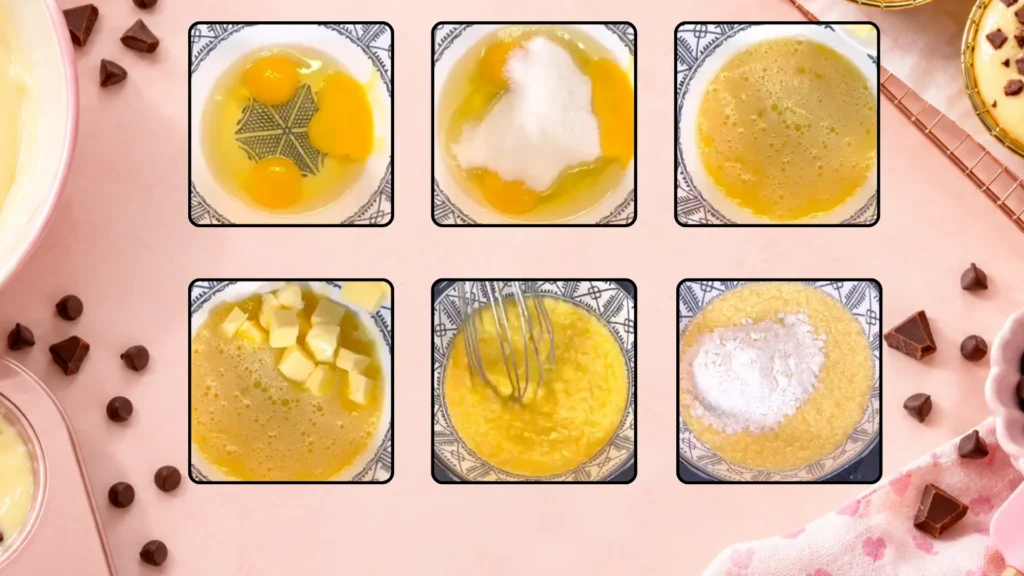
I start by cracking three eggs into a large mixing bowl.
Then I add half a Moroccan tea glass of granulated sugar.
Using a whisk, I mix everything together until the ingredients are combined and the mixture becomes a little lighter.
This is the beginning of our soft cake batter.
I don’t need a complicated mixer for this step.
A regular hand whisk works perfectly well.
Step 2: Add the Softened Butter
Next, I add three tablespoons of softened butter.
The butter should be at room temperature, with a soft, creamy texture rather than melted.
I whisk it into the egg-and-sugar mixture.
And here’s a little reassurance from my kitchen: if the butter doesn’t disappear completely into the mixture immediately, that’s okay.
Small pieces can become better incorporated as the other ingredients are added.
Step 3: Pour in the Oil and Milk
Now I add half a Moroccan tea glass of neutral vegetable oil.
I mix again.
Then I add a pinch of salt, one sachet of vanilla sugar, and half a Moroccan tea glass of milk.
I whisk until everything looks more evenly combined.
The butter and oil work together to give the finished cakes a tender texture.
At this stage, the mixture may look quite fluid.
That’s normal, because we haven’t added the flour yet.
Step 4: Sift the Flour and Baking Powder
I measure two and a half Moroccan tea glasses of all-purpose flour.
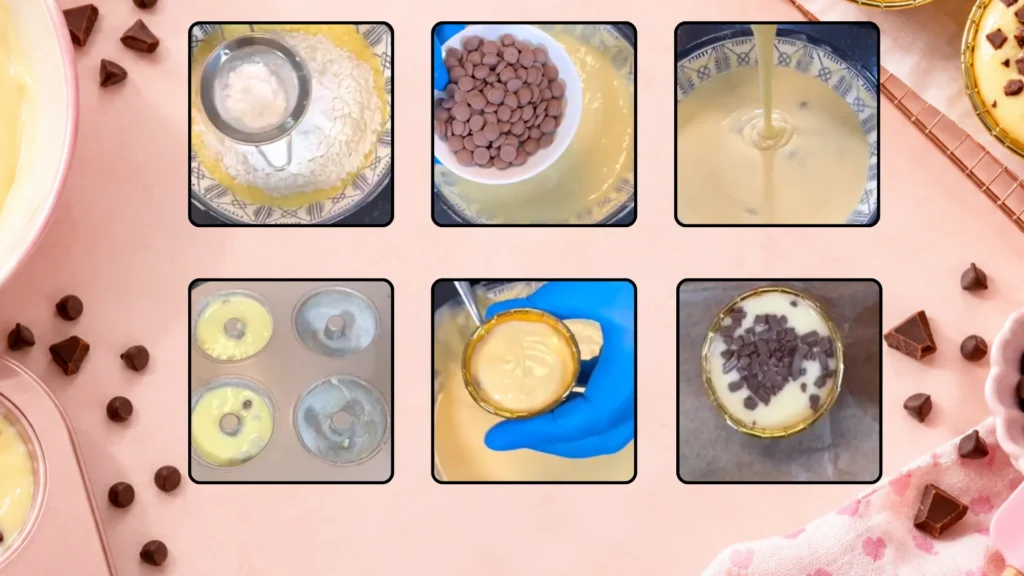
Then I sift the flour into the mixing bowl.
I also sift in the two sachets of baking powder used in my original preparation.
Sifting helps distribute the dry ingredients and break up lumps.
I fold and whisk gently until the batter becomes smooth.
My goal is a batter that’s neither extremely runny nor excessively thick.
It should be easy to spoon or pour into the small molds.
I avoid mixing for longer than necessary once the flour has been incorporated.
Step 5: Fold in the Chocolate Chips
Now comes the part my kids get excited about.
Chocolate!
I add chocolate chips to the batter.
If I don’t have chips, I can chop some chocolate into small pieces instead.
I stir gently until the chocolate is distributed throughout.
The exact amount depends on how chocolatey I want the cakes.
And yes, it’s tempting to taste the batter at this point, but I don’t. Raw eggs and uncooked flour should never be eaten.
Step 6: Prepare the Mini Cake Molds
For this batch, I used two types of molds.
The first was a small doughnut-shaped cake mold.
I lightly greased it with butter and dusted it with flour to help prevent sticking.
For the second shape, I used individual baking cups.
I placed the cups securely on a baking tray, following the manufacturer’s instructions for oven use.
Then I distributed the batter among the molds.
I leave some room for the cakes to rise.
Finally, I sprinkle a little extra chocolate on top of some of them.
You can keep the decorations simple or add other toppings that are appropriate for the child’s age and any school food restrictions.
Step 7: Bake Until Golden and Set
I preheat my oven to approximately 350–355°F (180°C).
Then I place the prepared cakes inside.
In my original preparation, I baked them for about 25 minutes.
Because the cakes are small and the molds vary, I recommend checking them before the full time has passed.
The cakes should look golden and be fully set in the center.
A toothpick inserted into the cake portion should come out without wet batter, although melted chocolate may leave a chocolate mark.
Once baked, I remove the cakes from the oven and allow them to cool.
Then I carefully release them from the molds.
And there they are!
Soft, golden chocolate chip mini cakes ready for a little lunchbox happiness.
Mama Emily’s Best Tips for Perfect Mini Cakes
Use softened butter
Room-temperature butter is easier to incorporate than cold butter straight from the refrigerator.
Measure with the same glass
This matters especially when following a recipe that uses Moroccan tea-glass measurements.
Changing glass sizes halfway through can change the ingredient proportions.
Don’t overmix after adding flour
Mix only until the ingredients come together. Excessive mixing can produce a firmer cake.
Use different molds for variety
I love making doughnut-shaped cakes and small round cakes from the same batter.
Just remember that different mold sizes may bake at different speeds.
Add chocolate to the top
A few extra pieces make the cakes look especially tempting after baking.
Let the cakes cool before packing
Warm cakes can release moisture inside a closed container.
Cooling them completely helps avoid unwanted condensation.
Can You Freeze Chocolate Chip Mini Cakes?
Yes!
And I love this trick for making school lunches easier.
After baking, I let the mini cakes cool completely.
Then I place them in freezer-safe containers or bags, separating layers if needed to prevent sticking.
I label the package with the date.
When I need some for another lunch, I take out the number required and thaw them safely in an appropriate covered container.
Freezing lets me enjoy the convenience of having homemade baked treats available without baking every school morning.
It can also help reduce food waste when a recipe produces more cakes than my family will eat right away.
How I Pack These Mini Cakes for School
For School Lunchbox Idea #12, I placed two little cakes in the smaller compartment of my blue lunchbox.
I like keeping them separate from the savory food so they don’t absorb moisture from the slaw or potatoes.
The cakes contain wheat, eggs, and dairy, and the chocolate may introduce additional allergens.
I always check the school’s food policy and any ingredient restrictions before packing homemade treats.
And I remember that dessert is simply one part of the lunch—not something a child has to earn by finishing everything else.
Frequently Asked Questions About Chocolate Chip Mini Cakes
Can I bake chocolate chip mini cakes in silicone cups?
Absolutely! These chocolate chip mini cakes bake beautifully in oven-safe silicone cups. I love using colorful silicone molds because they make the cakes look adorable and are easy to handle once cooled.
Just place the molds on a sturdy baking tray, avoid overfilling them, and follow the manufacturer’s temperature guidelines.
Can I make easy chocolate chip mini cakes with chopped chocolate?
Yes! If you don’t have chocolate chips, simply chop your favorite baking chocolate into small pieces.
I sometimes prefer chopped chocolate because it creates little pockets of melted chocolate throughout the cakes. Both options work wonderfully for these easy chocolate chip mini cakes.
Why are my chocolate chip mini cakes dense instead of soft and moist?
If your chocolate chip mini cakes turn out too dense, the most common causes are adding too much flour, using the wrong amount of baking powder, or overmixing the batter.
For a soft texture, measure your ingredients consistently, check the weight of your baking powder sachets, and stop mixing once the flour is incorporated.
And here’s my little Mama Emily tip: don’t overbake! Start checking your cakes a few minutes before the suggested baking time ends.
Can I prepare chocolate chip mini cakes ahead of time for school lunches?
Of course! That’s one of the reasons I love this recipe.
Once your chocolate chip mini cakes have cooled completely, store them in an airtight container or freeze individual portions for another day.
These little homemade treats are convenient for busy school mornings, especially when you prepare a batch in advance.
Are chocolate chip mini cakes the same as mini chocolate muffins?
They’re very similar, but not necessarily identical.
A mini chocolate muffins recipe may use different ingredient proportions and mixing techniques. My version uses a soft cake batter baked in individual cups or mini doughnut-shaped molds.
The doughnut-shaped cakes aren’t fried doughnuts. They’re simply little baked cakes with a playful shape!
How do I keep homemade chocolate chip mini cakes moist?
The secret to soft, moist chocolate chip mini cakes is to avoid overmixing and overbaking.
I use softened butter, vegetable oil, and milk in my original recipe to create a tender crumb. Once baked, I let the cakes cool before storing them in an airtight container.
And if you’re packing them for your kids, keep them separate from wet foods so they stay fresh and delicious until lunchtime.
A Sweet Little Ending from Mama Emily
If there’s one thing I love about homemade baking, it’s that the smallest cakes can create the happiest little moments.
A few eggs, a little vanilla, some chocolate, and suddenly the kitchen smells wonderful.
These chocolate chip mini cakes are a reminder that we don’t always need an elaborate dessert.
Sometimes a simple homemade treat is exactly enough.
Want to see how I packed them? Take a look at School Lunchbox Idea #12 with crispy chicken tenders, cheesy potato wedges, and creamy carrot slaw.
You can also use my free Recipe Calorie Calculator to estimate nutrition once you have confirmed your ingredient measurements.
💗 Looking for another sweet idea for your kids? Follow LunchboxBloom on Facebook for fun lunchbox treats, easy recipes, baking inspiration, and little stories from Mama Emily’s kitchen.
Because sometimes, happiness really does come in mini sizes!