

Chocolate Bread Roll-Ups: 5 Easy Steps to a Sweet Treat
The rolling pin comes out, and suddenly everyone wants to help. There’s bread to flatten, chocolate to spread, and a very important discussion about who gets the piece with the biggest swirl.
Some recipes turn an ordinary kitchen moment into something a little sweeter. These chocolate bread roll-ups do exactly that, using soft sandwich bread and a thin layer of chocolate spread. There’s no batter to mix and no oven to preheat—just a small treat you can put together with what you already have.
Cut into little pieces, they fit neatly beside a sandwich and fruit. Leave them plain for everyday packing, or add a light chocolate drizzle when you feel like making them extra cheerful.
- ⏱️ Prep Time
- 5 minutes
- 🔥 Cook Time
- 0 minutes — no baking needed
- ⌛ Total Time
- 5 minutes
- 🍽️ Servings
- 2–4 snack servings
- 🍫 Yield
- 2 rolls, cut into 4 pieces
- 💗 Estimated Calories
- 70–100 kcal per piece
Calories are approximate and depend on bread size and chocolate spread. Estimates exclude chocolate drizzle, sprinkles, and fruit. One piece is half of one bread roll.
What Are Chocolate Bread Roll-Ups?
Chocolate bread roll-ups are slices of crustless sandwich bread flattened with a rolling pin, spread with chocolate, and rolled into small logs.
For this version, the rolls stay soft and uncooked. They aren’t dipped in egg, fried in butter, or baked. That makes the preparation especially simple and keeps the texture close to a soft chocolate sandwich.
The spiral is the fun part. A familiar slice of bread looks completely different once you roll it and cut through the middle.
Ingredients for Chocolate Bread Roll-Ups
You only need two ingredients for the basic recipe. The finishing touches are optional.
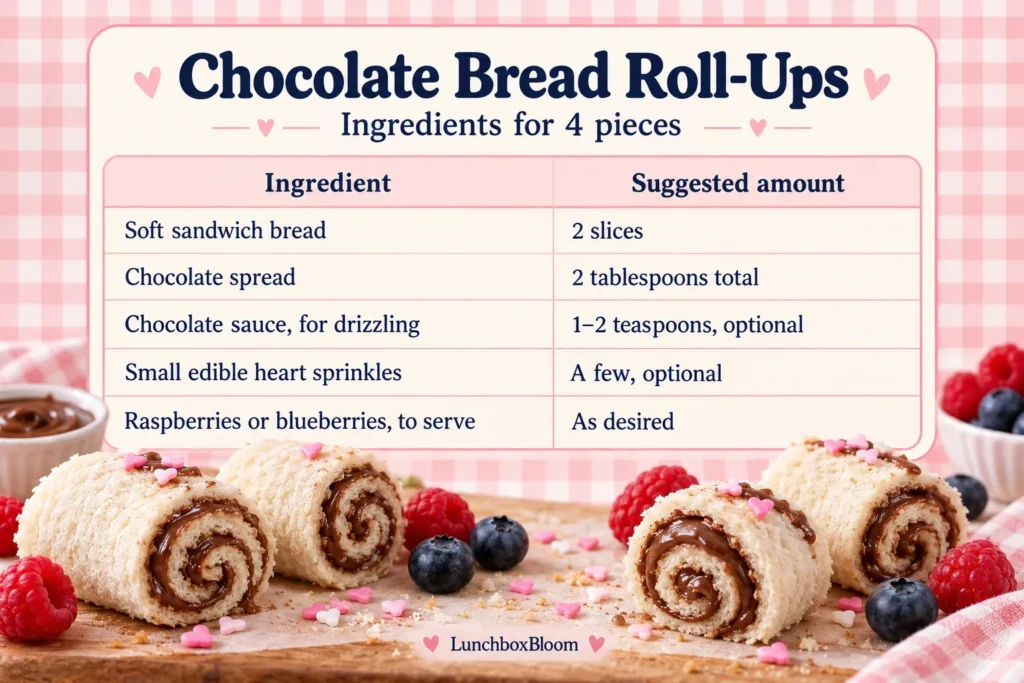
Choose fresh, flexible bread. A slice that bends easily is much more forgiving than bread that has started to dry out.
Check the chocolate spread label before packing these for school. Some contain hazelnuts, milk, soy, or other allergens. A school-approved alternative can work, but the ingredient list still needs checking.
How to Make Chocolate Bread Roll-Ups

1. Remove the Crusts
Place the bread slices on a clean cutting board and trim away the crusts with a knife.
Try to keep each slice in a neat square so the edges line up when you roll it. There’s no need to measure anything precisely; this is lunchbox preparation, not a geometry exam.
Save the crusts for another use, such as homemade breadcrumbs, if you like.
2. Flatten the Bread
Roll over each slice gently with a rolling pin until it becomes thin and flexible.
Use a few steady passes rather than pressing down hard all at once. You want to compress the bread without tearing holes through it.
Flattening makes these chocolate bread roll-ups easier to shape and helps create a more defined spiral.
3. Spread the Chocolate
Spread about one tablespoon of chocolate spread over each flattened slice.
Use a thin, even layer and leave a small strip of bread uncovered along the far edge. That clean edge helps the roll close without pushing chocolate out of the seam.
If the spread is very firm, let it soften slightly at room temperature until it spreads easily. Avoid dragging a stiff spoon through the delicate bread.
4. Roll Gently and Secure the Seam
Starting at the edge closest to you, roll the bread into a snug little log.
Guide it with your fingertips and keep the pressure gentle. Rolling too loosely leaves a gap in the middle, while squeezing too firmly pushes the filling out.
Set each roll seam-side down while you finish the second one. You don’t need a toothpick to hold it together.
5. Slice and Decorate
Using a sharp knife, cut each roll crosswise into two pieces. Wipe the blade between cuts if chocolate starts to collect on it.
Leave the pieces plain, or finish with a light drizzle of chocolate sauce and a few edible heart sprinkles.
Your chocolate bread roll-ups are ready to serve. For lunchbox packing, place them in a small separate compartment or silicone cup to keep chocolate away from the savory food.

Little Details That Make a Difference
Keep the Filling Thin
More chocolate sounds tempting, but a thick layer makes the rolls messy and harder to close.
Start with the suggested amount. Depending on your bread size, you may find that a slightly smaller quantity spreads more comfortably.
Use Soft Bread
Dry bread tends to crack as you roll it. Fresh sandwich bread gives you a smoother outside and a softer bite.
If a slice splits while you’re working, it can still become a perfectly enjoyable chocolate sandwich. No rescue mission required.
Cut Without Squashing
A sharp knife and a gentle slicing motion help preserve the shape. Pressing straight down with a blunt blade can flatten the spiral.
Go Light on the Drizzle
A little sauce adds decoration without soaking the bread. For a less messy school treat, skip the sauce and keep the chocolate inside.
Easy Variations to Try
Jam roll-ups: Replace the chocolate spread with a thin layer of smooth jam. Avoid overfilling, especially with a loose or runny preserve.
School-approved chocolate spread: Use a suitable alternative when nuts are restricted, checking the full label for other allergens and school requirements.
Whole wheat bread: Choose a soft, flexible loaf and flatten it carefully. The texture and flavor will differ slightly from the white-bread version.
Simple chocolate rolls: Leave off the sauce and sprinkles. The swirl gives them plenty of character on its own.
For another homemade sweet idea, take a look at our Heart-Shaped Sablé Cookies.
Packing Chocolate Bread Roll-Ups for School
Pack the rolls in a container that protects their shape, with fruit in a separate compartment. Dry washed berries before adding them so excess moisture doesn’t soften the bread.
Follow the storage instructions on your chocolate spread and sauce. If you add any filling that requires refrigeration, keep the rolls appropriately chilled.
When these are packed alongside the tuna sandwiches from School Lunchbox Idea #11, keep the entire lunch in an insulated bag with cold packs because the sandwiches are perishable.
For the savory part of the meal, pair them with Tuna Sandwiches for Kids. Add that link once the sandwich article is published.
Can You Make Them Ahead?
For the softest texture, make these chocolate bread roll-ups on the day you plan to serve them.
If preparing them earlier, store them in a tightly closed container and follow the storage directions for the ingredients you used. Add any chocolate drizzle closer to serving to help keep the surface tidy.
You can also trim the bread and gather your ingredients ahead, leaving the spreading and rolling for the morning.
FAQ: Chocolate Bread Roll-Ups
Can I make chocolate bread roll-ups with sliced bread?
Yes! Soft sliced bread works best for these chocolate sandwich bread rolls; remove the crusts, flatten, fill, and roll.
Can I make Nutella bread rolls without eggs?
Yes. These no-bake chocolate rolls need no egg coating; check your bread and spread labels if avoiding eggs.
Are chocolate bread roll-ups easy lunchbox treats?
Yes! Cut these bread roll-ups for kids into small pieces and pack separately from moist foods.
Can I make this chocolate bread roll-ups recipe in an air fryer?
This recipe needs no cooking; air frying changes the texture and requires a separately tested method.
A Small Treat, Made Together
If your child wants to help, let them flatten the bread or spread the chocolate with a suitable blunt utensil. An adult can handle the trimming and slicing.
The rolls may come out a little uneven. One might lean sideways, and another might have chocolate peeking out of the end. Those little differences are part of making something together.
Save these chocolate bread roll-ups for a lunchbox treat, an afternoon snack, or a quiet kitchen moment with your child. For more simple recipes and lunch-packing inspiration, follow LunchboxBloom on Facebook.