

Sweet Lace Crepe Nests: 7 Steps to an Irresistible Dessert
I have a little confession to make.
The first time I tried drawing with pancake batter, I was convinced my frying pan had officially become an art studio.
A circle here. A zigzag there. A few wobbly lines that looked suspiciously like spaghetti.
And then something wonderful happened.
Those funny little lines turned into delicate, golden crêpes that I could fold into adorable dessert nests!
That’s how my sweet lace crepe nests became one of the most playful treats in my kitchen.
They’re made with a simple vanilla crêpe batter, piped into beautiful lace-like patterns, filled with a little jam, and finished with a drizzle of berry sauce.
No fancy pastry equipment. No complicated baking techniques.
Just a squeeze bottle, a nonstick skillet, and a little creativity.
And believe me, this is one of those recipes where the imperfect shapes are often the cutest ones.
👩🍳 Recipe at a Glance
Nutrition values are estimates based on the suggested ingredients and may vary depending on serving size, jam, and berry sauce.
What Are Sweet Lace Crepe Nests?
Sweet lace crepe nests are delicate, thin crêpes made by squeezing batter into connected circles and zigzag patterns instead of pouring it into a traditional round pancake.
Once cooked, the golden lace-like crêpes are gently gathered around a little jam and arranged in small silicone cupcake cups.
I finish mine with a touch of raspberry or mixed-berry sauce.
The result is a dessert that looks like a tiny edible nest.
They’re fun for birthday parties, family treats, and school lunchboxes when properly cooled and packed.
Ingredients for Sweet Lace Crepe Nests
These suggested quantities make approximately 10–12 small nests, depending on the size of your patterns.
For the Vanilla Lace Crêpes
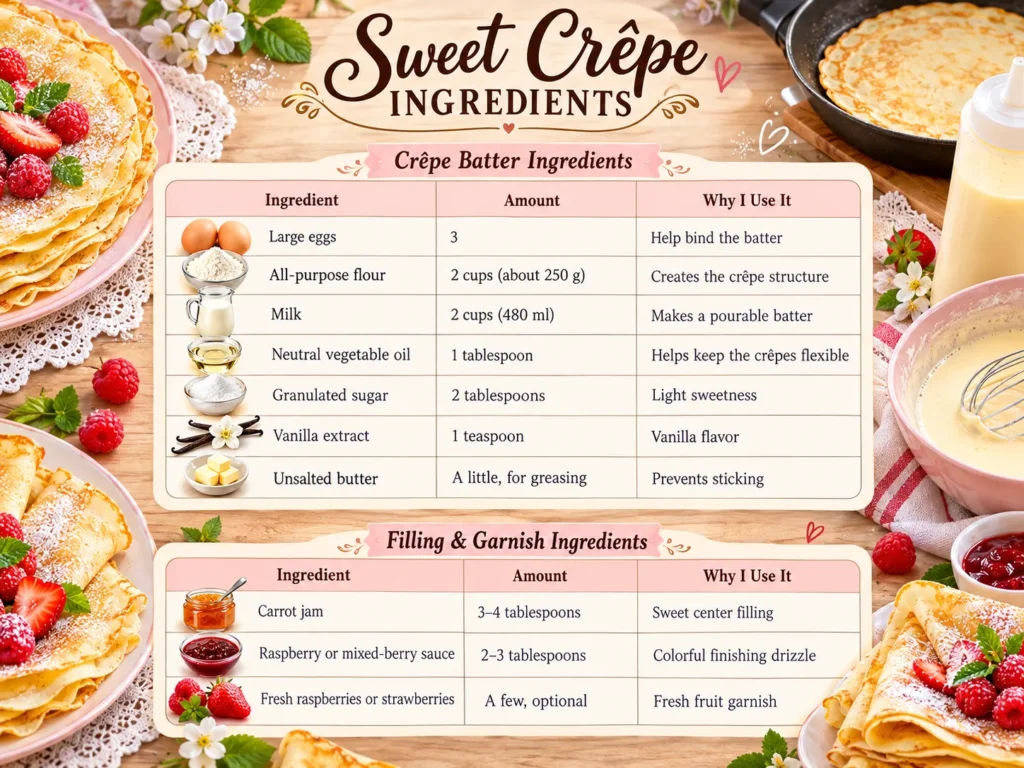
Emily’s note: In my original preparation, I used two small packets of vanilla flavoring. If you’re using vanilla sugar packets instead of extract, adjust the added sugar to taste.
You can replace the carrot jam with apricot or strawberry jam if that’s what your family enjoys.
How to Make Sweet Lace Crepe Nests in 7 Easy Steps
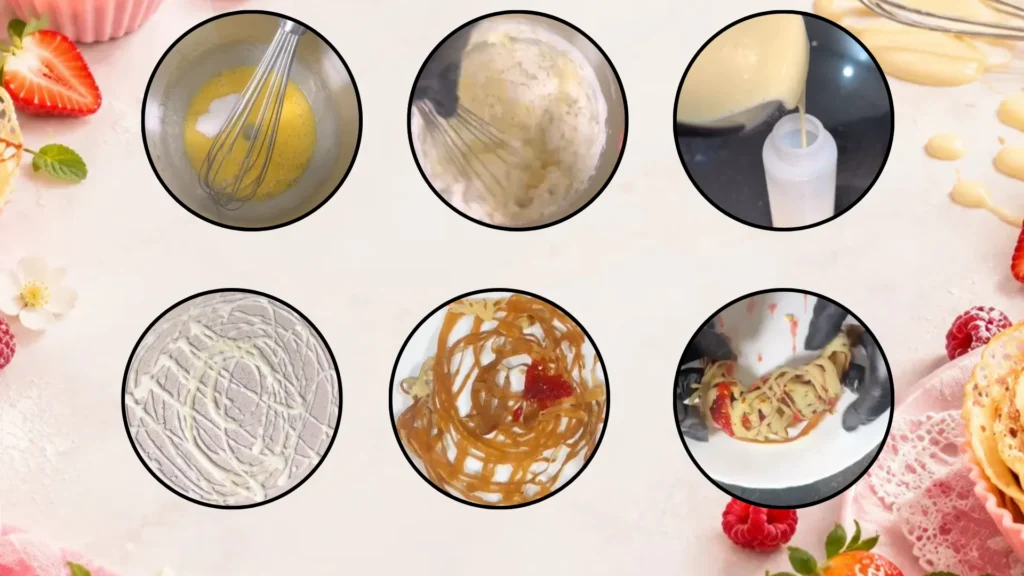
Step 1: Whisk the Eggs, Sugar, and Vanilla
I start by cracking three eggs into a large mixing bowl.
Add the granulated sugar, vanilla extract, and vegetable oil.
Using a hand whisk, mix everything until the ingredients are well combined.
I prefer using a regular whisk instead of an electric blender.
There’s no need to beat the batter aggressively. I just want everything smooth and evenly mixed.
And yes, a little arm exercise before dessert counts as multitasking.
Step 2: Add the Milk and Flour
Slowly pour in the milk while continuing to whisk.
Next, add the flour gradually, mixing until the batter becomes smooth.
I try to avoid adding all the flour at once because nobody enjoys chasing flour lumps around a bowl.
The finished batter should be thin enough to flow through a squeeze bottle but thick enough to hold visible lines in the skillet.
If it seems too thick, add a tablespoon of milk at a time.
If it’s slightly lumpy, let it rest for a few minutes and whisk again.
Important: This batter contains raw eggs and flour, so don’t taste it before cooking.
Step 3: Transfer the Batter into a Squeeze Bottle
Now comes my favorite little kitchen trick.
Pour the batter into a clean, food-safe squeeze bottle with a narrow opening.
A small funnel makes this easier.
I love using a squeeze bottle because it gives me control over the lines and shapes.
Unlike traditional crêpes, where you pour batter across the whole pan, these lace crêpes are created almost like drawings.
Make sure the bottle opening isn’t too narrow, or the batter may become difficult to squeeze.
And don’t worry if your first attempt looks a little unusual.
I like to think of it as abstract crêpe art.
Step 4: Draw Your Lace Pattern in the Skillet
Heat a nonstick skillet over medium-low heat.
Lightly grease it with a small amount of butter.
Once the pan is warm, gently squeeze the batter into circular lines.
Start near the center and work outward, creating several connected circles.
Then add zigzag lines across the circles to hold the pattern together.
The idea is to create a delicate web of batter with small gaps between the lines.
Try to keep the lines connected so the crêpe doesn’t fall apart when you lift it.
You can make spirals, loops, or little flower-inspired designs.
Every pattern can be slightly different.
That’s part of the fun!
Step 5: Cook Both Sides Until Lightly Golden
Let the lace crêpe cook until the surface looks set and the bottom is lightly golden.
Depending on the thickness of your lines and the heat of the pan, this may take about one to two minutes.
Carefully loosen the edges with a thin spatula.
Then gently flip the entire pattern.
Cook the second side until the batter is fully cooked.
The crêpe should be flexible, with no wet batter remaining.
Transfer it to a clean plate and repeat with the remaining batter.
I like keeping the temperature moderate because thin lace patterns can brown much faster than regular crêpes.
Step 6: Add the Jam and Create the Nests
Once a lace crêpe has cooled enough to handle, lay it flat on a clean plate.
Add a small teaspoon of carrot jam near the center.
This is the filling I used in my original recipe, and I love how a little sweetness brings the delicate strips together.
You can use another smooth jam if you prefer.
Gently lift the outer edges of the crêpe toward the middle, gathering the lace into a loose nest.
Don’t squeeze too tightly.
I want the little loops and ribbons to remain visible.
Place the finished nest inside a clean silicone cupcake liner.
Suddenly, that ordinary crêpe batter has become something that looks like a miniature pastry-shop dessert.
Step 7: Finish with Berry Sauce and Pack
Arrange the finished crêpe nests inside their silicone liners.
Add a small drizzle of raspberry or mixed-berry sauce.
I use just enough to add a little bright red color without making the delicate crêpes soggy.
If I have fresh raspberries or strawberries available, I sometimes add a small piece on top.
For school lunches, I prefer packing the sauce separately and adding it shortly before eating when possible.
Let the cooked crêpes cool promptly, refrigerate them in a sealed container, and pack them chilled in an insulated lunch bag with cold packs.
And there you have it!
Sweet, golden, delicate little crêpe nests that look much more complicated than they really are.
Why I Love These Lace Crêpes for Kids

One thing I especially enjoy about this recipe is the creative process.
Instead of simply mixing ingredients and waiting for dessert, there’s a little drawing and shaping involved.
Children can help think of different designs while an adult handles the hot skillet.
A heart, a flower, a spiral, or a funny squiggle?
There are plenty of possibilities.
I also love that the sweet filling is easy to adjust.
Some days, I use carrot jam. Other days, a spoonful of strawberry preserves feels just right.
Of course, these are sweet treats rather than a substitute for fruit, vegetables, or a balanced meal.
I serve them as a small dessert alongside other nourishing foods.
My Favorite Tips for Perfect Lace Crepes
The trickiest part of making lace crêpes isn’t the ingredient list.
It’s finding the right balance between batter consistency, pan temperature, and connected lines.
If the batter is too thick, it may not flow through the squeeze bottle smoothly.
If it’s too thin, the lines may spread and lose their shape.
If the pan is too hot, the delicate patterns can brown before you’re ready to flip them.
I always recommend testing one small crêpe first.
Think of it as your practice drawing.
And if it doesn’t turn out beautifully?
Well, the chef still gets to eat it.
That’s one of the perks of cooking.
How to Pack Lace Crepe Nests for School
These crêpe nests are the dessert in my School Lunchbox Idea #9.
I pair them with spinach-and-cheese stuffed chicken roulade over basil-lemon penne, plus fresh cucumber cream cheese rolls.
Explore the Complete School Lunchbox Idea #9
You can also find the other recipes here:
Because these crêpes contain cooked eggs and dairy ingredients, I treat them as perishable.
I cool them promptly, refrigerate them in a covered container at 40°F (4°C) or below, and pack them in an insulated lunch bag with at least two cold sources.
To preserve their delicate texture, I prefer assembling and serving them the same day.
Frequently Asked Questions About Lace Crepe Nests
Can I make sweet lace crepe nests without a squeeze bottle?
Yes! You can use a food-safe piping bag with a small opening. A squeeze bottle is simply easier for controlling the batter lines.
Why do my lace crêpes break when I flip them?
The lines may not be connected, the batter may be too thin, or the crêpe may need a little more cooking time before turning.
Can I use strawberry jam instead of carrot jam?
Absolutely. Strawberry, raspberry, and apricot jam are all delicious alternatives.
Can I prepare lace crêpes the night before?
Yes. Cook them thoroughly, cool and refrigerate promptly, and store them in a sealed container. Add the filling and sauce closer to serving time for the best texture.
Are lace crêpes suitable for school lunchboxes?
Yes, as an occasional homemade treat when packed safely, kept properly chilled, and made with ingredients that suit your child’s dietary needs.
A Little Dessert That Encourages Creativity
Sometimes the most memorable things I make in my kitchen aren’t the ones that require the most effort.
They’re the ones that begin with a simple idea and turn into something unexpected.
These sweet lace crepe nests started with ordinary crêpe batter and a squeeze bottle.
And now they’re little golden swirls filled with jam and topped with a cheerful splash of berry sauce.
I love that there’s no single perfect way to draw them.
Every nest has its own personality.
And maybe that’s what makes homemade cooking so enjoyable.
It doesn’t always have to look exactly like the picture.
Sometimes, the little imperfections are the best part.
💗 Want more fun recipes and creative lunchbox surprises? Follow LunchboxBloom on Facebook! I share new kids’ recipes, playful dessert ideas, clever cooking tips, little family stories, and behind-the-scenes secrets from Mama Emily’s kitchen every day. There’s always something delicious waiting to bloom!